As you may know cleaning an encrypted disk is often required before starting an image via ConfigMgr. This presents problems in that the disk is not accessible for a package to be stored upon it and often means we have to manually run diskpart to clean the disk.
I wasn't happy with this and with the current 8.1 deployment I am working I thought there must be a way around it....
So I came up with the following powershell 1 liner to handle this issue:
Powershell.exe Get-Disk | % {Clear-Disk -Number $_.Number -RemoveData -RemoveOEM -Confirm:$False}
Shown below in the screenshot
The only downside with this is that you have to add the following optional components to your boot images so they will become around 100mb larger:
WinPE-StorageWMI
WinPE-NetFx
WinPE-PowerShell
Cheers
Wayne
*Please be aware, this will clean ALL disks in the machine*
Most Popular Posts
Wednesday, 29 January 2014
Wednesday, 22 January 2014
Windows 7 Restarts at Capture step ConfigMgr 2012 R2
The title says it all, I am currently building and capturing a Windows 7 Enterprise x64 image at a customer site using ConfigMgr 2012 R2.
When the Task sequences gets up to the capture step it spontaneously reboots and I end up with a 0kb .wim file, not much use...
The logs however show the following:
See the reboot pending?. Add a reboot in between your Prepare OS and Capture the reference machine steps and you may find you have a bit more luck with it ;)
(Also despite what it may look like I had full network connectivity at this point)
Possibly a bug with R2, I'm not sure but either way its a suitable workaround
Cheers
Wayne
When the Task sequences gets up to the capture step it spontaneously reboots and I end up with a 0kb .wim file, not much use...
The logs however show the following:
See the reboot pending?. Add a reboot in between your Prepare OS and Capture the reference machine steps and you may find you have a bit more luck with it ;)
(Also despite what it may look like I had full network connectivity at this point)
Possibly a bug with R2, I'm not sure but either way its a suitable workaround
Cheers
Wayne
Monday, 13 January 2014
SCCM 2012 - Auto Create Software Update Group from MBSA results
I am trying to solve a few problems with this post, these being:
1) How can I incorporate the latest updates into my gold image & thereby increase the security of my gold image?
2) How do I install updates that are not serviceable offline?
3) How can I speed up a build and capture?
4) How can I Save time when creating Software update groups?
Now most of you at this point are probably thinking "Does he not know about the variable PreserveDriveLetter? and offline servicing", well yes I do and don't get me wrong both of these serve a great purpose and can be invaluable at times. However I have built far too many windows images to know that offline servicing, as great as it is doesn't always work 100% of the time and requires manual effort to check through the OfflineServicingEngine log and also to know that no matter how much you tell yourself its OK you really should have put .Net x into that image because now that its complete you have a long wait whilst your "fully patched wim" installs 20+ .NET updates, I could go on....
Anyway, I am a big believer in running MBSA scans on a "gold" image for a number of reasons:
1) To ensure it is as secure as possible the second that the image is applied to the disk
2) To capture any updates that are not serviceable offline (more on this later)
3) Peace of mind
As you may or may not know, when you run MBSA (link here) it generates you a nice report that you can save as a text file. The report will tell you which updates are missing/ recommended.
So what I usually do is install windows inside a virtual machine (The exact version the customer requires), install the ConfigMgr client (as this has certain prereqs that need to be patched) and then run the MBSA to tell me what is missing.
I then create a software update group containing only those updates, create a build and capture task sequence and throw updates such as KB2533552 or KB2538243 in there, along with .NET.
What this gives me is a lean build and capture process that includes all security updates for the OS, .NET etc and also some updates that cannot be serviced offline such as KB2533552 or that are not available via WSUS such as KB2538243. See MS Article here for more information.
It also gives the customer a bunch of updates they can use to patch their existing estate to this baseline and gives them a place to start with patching moving forward
To make this a little more automatic I wrote a script that will analyse the output from MBSA and create a software update group containing all of the missing updates for that particular architecture. Call it version 0.1 as it has only had limited testing, but it has saved me a lot of time, I do intend to make it a lot slicker with logging if I get the chance.
Be aware this will add ALL missing updates to the new group, I recommend manually checking and removing things like Internet Explorer version X if not required.
The script can be found on my skydrive here
EDIT: V0.2 of the script is up now, still needs some work.....
Thanks for reading
Wayne
1) How can I incorporate the latest updates into my gold image & thereby increase the security of my gold image?
2) How do I install updates that are not serviceable offline?
3) How can I speed up a build and capture?
4) How can I Save time when creating Software update groups?
Now most of you at this point are probably thinking "Does he not know about the variable PreserveDriveLetter? and offline servicing", well yes I do and don't get me wrong both of these serve a great purpose and can be invaluable at times. However I have built far too many windows images to know that offline servicing, as great as it is doesn't always work 100% of the time and requires manual effort to check through the OfflineServicingEngine log and also to know that no matter how much you tell yourself its OK you really should have put .Net x into that image because now that its complete you have a long wait whilst your "fully patched wim" installs 20+ .NET updates, I could go on....
Anyway, I am a big believer in running MBSA scans on a "gold" image for a number of reasons:
1) To ensure it is as secure as possible the second that the image is applied to the disk
2) To capture any updates that are not serviceable offline (more on this later)
3) Peace of mind
As you may or may not know, when you run MBSA (link here) it generates you a nice report that you can save as a text file. The report will tell you which updates are missing/ recommended.
So what I usually do is install windows inside a virtual machine (The exact version the customer requires), install the ConfigMgr client (as this has certain prereqs that need to be patched) and then run the MBSA to tell me what is missing.
I then create a software update group containing only those updates, create a build and capture task sequence and throw updates such as KB2533552 or KB2538243 in there, along with .NET.
What this gives me is a lean build and capture process that includes all security updates for the OS, .NET etc and also some updates that cannot be serviced offline such as KB2533552 or that are not available via WSUS such as KB2538243. See MS Article here for more information.
It also gives the customer a bunch of updates they can use to patch their existing estate to this baseline and gives them a place to start with patching moving forward
To make this a little more automatic I wrote a script that will analyse the output from MBSA and create a software update group containing all of the missing updates for that particular architecture. Call it version 0.1 as it has only had limited testing, but it has saved me a lot of time, I do intend to make it a lot slicker with logging if I get the chance.
Be aware this will add ALL missing updates to the new group, I recommend manually checking and removing things like Internet Explorer version X if not required.
The script can be found on my skydrive here
EDIT: V0.2 of the script is up now, still needs some work.....
Thanks for reading
Wayne
Saturday, 12 October 2013
Powershell - Enable incremental updates on collections
I am busy at the moment migrating a customer from SCCM 2007 to 2012, as part of the migration I disabled incremental updates on all collections so as not to hurt performance. The customer has a folder of collections that they use to deploy software via active directory groups, all collections are prefixed "AD Deploy". They wanted to enable scheduled & incremental updates on these collections only so I set to do this with powershell, disappointed that there was no cmdlet for this I turned to WMI.
Using the SMS_Collection class from the SMS namespace I was able to filter on collections begining with "AD Deploy" and set the property (RefreshType in this case) to a value of 6, which would enable incremental and scheduled updates. Below is the script I came up with.
#======Start Script==============
$Collections = (Get-WmiObject -Class SMS_Collection -Namespace "root\SMS\site_007" -ComputerName . -Filter "Name Like 'AD Deploy%'")
$Count = 0
foreach ($Col in $Collections){
$Col.RefreshType = 6
$Col.put() | Out-Null
Write-Host $Col
write-host $Col.Name
$Count ++
}
write-host $Count "collections in total"
#=========End Script===========
Here is a link to the script
You can change the filter for collections in your environment if you wish to use it, I would also recommend commenting out the "$Col.put() | Out-Null" line for the first run and do a manual check/count of the collections that this might actually affect ;)
Hope it helps someone out there :)
Wayne
Using the SMS_Collection class from the SMS namespace I was able to filter on collections begining with "AD Deploy" and set the property (RefreshType in this case) to a value of 6, which would enable incremental and scheduled updates. Below is the script I came up with.
#======Start Script==============
$Collections = (Get-WmiObject -Class SMS_Collection -Namespace "root\SMS\site_007" -ComputerName . -Filter "Name Like 'AD Deploy%'")
$Count = 0
foreach ($Col in $Collections){
$Col.RefreshType = 6
$Col.put() | Out-Null
Write-Host $Col
write-host $Col.Name
$Count ++
}
write-host $Count "collections in total"
#=========End Script===========
Here is a link to the script
You can change the filter for collections in your environment if you wish to use it, I would also recommend commenting out the "$Col.put() | Out-Null" line for the first run and do a manual check/count of the collections that this might actually affect ;)
Hope it helps someone out there :)
Wayne
Tuesday, 9 July 2013
Tuning your ConfigMgr 2012 Reporting Point For Speed
I have been doing some testing around this as the speed I see on the reporting node is often disappointing, and I have made some (not so shocking) discoveries. To speed up your reporting point do the following:
- Set the initial Size of the ReportServer$ database, by default it is 6mb! once you install a RP it jumps to around 90 and then starts to increase for every report you run. Set its initial size to 1024mb that should help.
- Set the autogrow on the database to 1024, it shouldn't ever grow beyond the initial 1024 anyway.
- Set the initial size of the ReportServer$ transaction logs to 1024mb
- Set the autogrow on the transaction logs, again 1024mb is fine,as long as you take a backup you should be fine, providing you....
- Set the recovery mode to SIMPLE. If you don't do this then be prepared to hit disk space issues down the line. Setting to simple commits the logs and starts afresh after a backup
- Set the ReportServer$TempDB inital size to 1024mb with autogrow at 1024mb again
- Split the ReportServer$TempDB into X number of files where X= as many cores as you have (e.g4 vCpus = 4 files) up to a maximum of 8 files (and I do recommend 8 if you can)
- Set the sizes of these files to 1024mb and their autogrowth to 1024mb
Restart the SQL services or the whole box and check out how fast it is, I can barely keep up :)
NB. This was all tested quick and dirty in a lab environment, so please size accordingly and monitor in your environment to ensure all is well.
Wayne
SCCM 2007 Migration failure due to site system named LOCALHOST
This post covers an issue I encountered during a migration and how to fix it.
Wayne
If you are performing a Configuration Manager 2007 to 2012 Migration and have a site system in the console with the name LOCALHOST that holds the ConfigMgr site server database role as shown:
You will see the following error in the Migmctrl.log file when attempting to gather data from the source hierarchy in your 2012 environment:
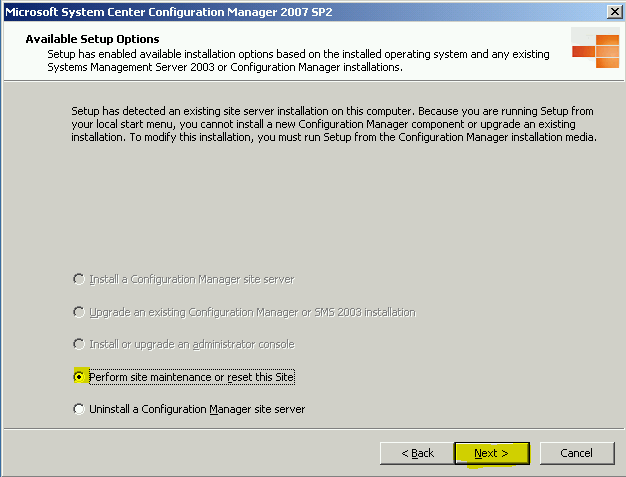
To fix this you must run ConfigMgr setup from the 2007 Site server:
When the wizard launches be sure to select Perform Site Maintenance or reset the Site
On the desired action page select Modify SQL Server Configuration
On the SQL Server Configuration page change LOCALHOST to the name of the ConfigMgr 2007 server.
Allow the wizard to complete and review the log file when given the opportunity. You should now see in the console that the ConfigMgr site server database role is now held by the correct site system and not LOCALHOST.
Back in the 2012 environment, retry the data gather and you should have a little more success :)
Wayne
Sunday, 13 January 2013
Windows Intune user sync issues
Following on from Steve Beaumont's post around Windows Intune, it is possible to use the .onmicrosoft address you chose to sync users into the cloud.
My testlab is called testlab.local and my chosen Intune domain name is testlab2013.onmicrosoft.com
To get my users syncing I had to create a UPN suffix in AD of "testlab2013.onmicrosoft.com", alter the users logon name to the new suffix, delete the users from SCCM and force a user discovery and hey presto the users began to sync upto Windows Intune no problems.
This is obviously great for a lab as you don't need to own a domain and don't need to verify any domains to do any testing
Cheers
Wayne
My testlab is called testlab.local and my chosen Intune domain name is testlab2013.onmicrosoft.com
To get my users syncing I had to create a UPN suffix in AD of "testlab2013.onmicrosoft.com", alter the users logon name to the new suffix, delete the users from SCCM and force a user discovery and hey presto the users began to sync upto Windows Intune no problems.
This is obviously great for a lab as you don't need to own a domain and don't need to verify any domains to do any testing
Cheers
Wayne
Subscribe to:
Posts (Atom)