Most Popular Posts

Friday 28 December 2012

Creating A Virtual SAN Using Windows Server 2012 ISCSI Target Role Under Hyper-V

This Blogpost covers the following:

  • Installing the iSCSI Target Server Role on Server 2012
  • Installing the iSCSI Target SMI-S Provider (Optional)
  • Creating an iSCSI Virtual Disk
  • Connecting to the iSCSI Virtual Disk from another machine using iSCSI Initiator

NOTE:**This is for my lab only, I do not recommend you do this in production***

First launch the add roles and features wizard in server 2012 and on the roles page select the iSCSI Target Server Role as shown below


Allow the installation to complete and the server to reboot.

Next if you wish for your virtual SAN to have SMI-S support then you need to first install KB2758246

Once that has been installed on the System Center Virtual Machine Manager SP1 media you will find iSCSITargetSMISProvider.msi in the AMD64\Setup\MSI folder


Run through the install which is no more complex than clicking Next, Next and Finish.


Now we have an iSCSI target server setup that supports SMI-S, more on SMI-S can be found here

In my lab I have simply attached a VHDX to my Server and then within that created my virtual iSCSI disks, this is by no means ideal however. I would have liked to have attached a physical disk to my virtual machine and run the Virtual iSCSI disks straight from that but didn't have a spare SSD lying around.

So to summarize my file server has a C: drive and an E: drive, both are VHDX files that live on the Hyper-V host everything runs on.

Now for the fun part, open Server Manager and browse to File And Storage Services -> iSCSI under iSCSI Virtual Disks click Tasks-> New iSCSI Virtual Disk


This will launch the new iSCSI Virtual Disk Wizard, select the volume on which you wish to store the disk and press Next


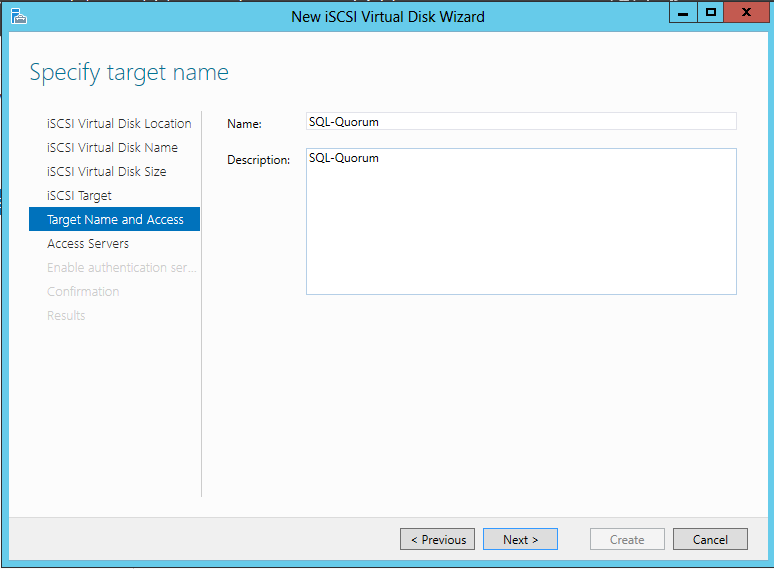
Give the disk a meaningful name, in my case I was setting up a SQL cluster so this was going to be my Quorum disk


Once complete press Next


Enter a size for your disk and press Next once complete


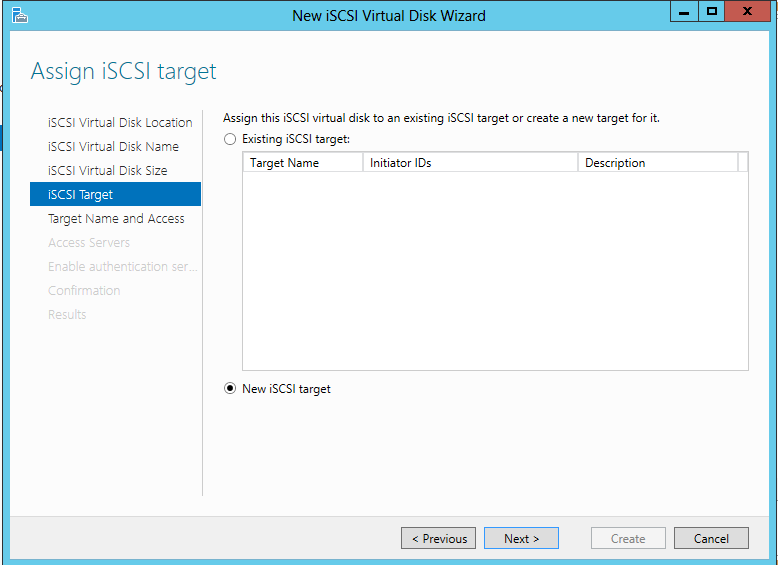
On the iSCSI Target page select New iSCSI Target and press Next


Give the Target a meaningful name and press Next once complete


Now we need the IQN of the initiator, to get this logon to the server you are connecting from and launch the iSCSI initiator control panel applet, if it prompts you to start the service click yes.

On the Configuration tab make a note of the Initiator Name


Back on the Target Server on the on the Access Servers page click Add

Now enter the IQN of the initiator in the box as shown

..

Press ok and you will see the iSCSI initiator listed, once complete click Next

Since this is a lab I chose not to configure Authentication and just pressed Next and then Create.

Now switch over to the iSCSI initiator machine (in my case one of the SQL Nodes) and in the iSCSI initiator software click on the Discovery tab

Click Discover Portal and enter the DNS Name of the iSCSI Target server and press OK


Now click on the Targets tab and you should see the target listed, select it and click Connect


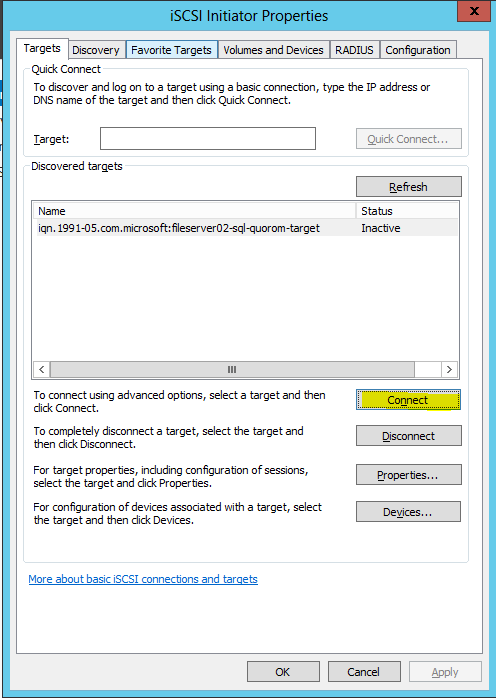
If the connection was successful you  will see the status change to Connected as shown


That's all there is to it, now open disk manager and bring the disk online :)

Cheers
Wayne

Thursday 22 November 2012

Enabling .Net 3.5 in your windows 8 Image

This blogpost covers how to enable .Net 3.5 in your windows 8 wim file and saves you the trouble of running DISM after deployment (or during) to enable it.

Note - This blogpost assumes that you are running this on a windows 8 / server 2012 machine.

First copy the contents of your Windows 8 ISO to a Directory on a drive (Lets call that "C:\Windows 8 Source" here)

Create a folder on your C: drive called "MountedWim"

Now open up an administrative command prompt and type the following:

Dism /Mount-Wim /Wimfile:"C:\Windows 8 Source\Sources\Install.wim" /index:1 /MountDir:C:\MountedWim

This will  mount the windows 8 wim file into this directory

Now type the following:

Dism /Image:C:\MountedWim /EnableFeature /FeatureName:NetFX3 /All /Source:"C:\Windows 8 Source\Sources\sxs"

This will enable .Net 3.5 in the image however we now need to save the changes we have made, next type:

Dism /UnMount-Wim /MountDir:C:\MountedWim /Commit

This will unmount the wim file and commit the changes.

Now deploy the image and you should have .Net 3.5 enabled by default :)

A quick "gotcha" on this, if you use offline servicing in configuration manager to integrate any .Net 3.5 updates into this wim since the .Net 3.5 install is in a "Pending" state your Task Sequence will fail, so watch out for that.

Cheers
Wayne

Thursday 15 November 2012

Microsoft UE-V Setup & Configuration

This blogpost aims to cover step by step the setup and configuration of UE-V to a basic level.Lets get started...

First of all you have to have Software Assurance as UE-V comes as part of MDOP (Microsoft Desktop Optimisation Pack) if you don't have SA then UE-V is just one of the many reasons you need it.

Secondly I will run through the components of UE-V to bring you up to speed:

UE-V is comprised of 4 components
  • Settings Store - Where the agent stores the application settings
  • UE-V Agent - the Agent itself
  • Settings location Template- Files that define what will be synced on a per app basis (One template per app)
  • UE-V Generator - used to capture application settings to create an XML based template the UE-V Agent can read
On with the guide....

1) In a suitable location (preferably a DFS Namespace) create 2 folders called "SettingsStoreShare" & "SettingsTemplateCatalog" we will discuss permissions on these folders in a moment

2) Create an Active Directory Group that will contain users we wish to have UE-V for the purpose of this post that group will be called "Corp.Sys.UevUsers" but you may call it whatever fits your naming standards

3) Now share permissions on the 2 folders:

SettingsStoreShare
Share Name - SettingsStoreShare$
Share Permissions - Corp.Sys.UevUsers (Full Control)
NTFS Permissions - Corp.Sys.UevUsers (List Folder/Read Data & Create Folders / append data)

SettingsTemplateCatalog
Share Name - SettingsTemplateCatalog$
Share Permissions - Domain Computers (Full Control)
NTFS Permissions - Domain Computers (Read Access) & Domain Admins (Full Control)

4) Take your UE-V admx file and place it in your central store,which should be located at \\FQDN\Sysvol\FQDN\Policies\PolicyDefinitions and place the adml file in the same location but one folder deeper \\FQDN\Sysvol\FQDN\Policies\PolicyDefinitions\en-us

5) Before we create our group policy object, know that it contains both user and computer settings and in my case is linked to an OU that is above both my Windows workstations and my Users so will apply the settings to both. If your Active Directory is not structured as such I recommend creating 2 policies here.

Open the Group policy management console and create a group policy Object, then browse to Computer Configuration\Policies\Administrative Templates\Windows Components\Microsoft User Experience Virtualization
Now change the policy as shown in the picture


Still in the policy browse to User Configuration\Policies\Administrative Templates\Windows Components\Microsoft User Experience Virtualization
Now change the policy as shown in the picture


You will notice the Applications node, for now just enable Notepad/Wordpad within this node for testing purposes.

UE-V relies entirely on Microsoft's Offline Files Services so we also need to set a policy up to ensure this is switched on. I have enabled this policy within my UE-V GPO but you may already have it set somewhere so I will leave it up to you to decide how best to do this. The offline files setting we need to enable is located here:
Computer Configuration\Policies\Administrative Templates\Network\Offline Files\Allow Or Disallow The Use Of The Offline Files Feature.  This should be set to "Enabled"

6) Next we need to create a WMI filter to apply to this policy, this filter will ensure that only Windows 7 or Windows 8 devices can apply the policy

Within Group Policy management console, right click on the WMI filters node and select New. Give it a name like Windows 7&8 and add the following WMI query:

Select * from Win32_OperatingSystem WHERE Version like "6.1%" AND ProductType="1" OR Version like "6.2%" AND ProductType="1"

Save this filter.

ProductType="1" ensures that we only apply this Policy to workstations and NOT Servers!

7) Now open he group policy objects node and select  your new WMI filter as shown:


8) Now to add some filtering for the users, we only want users in our Corp.Sys.UevUsers group to apply this policy so still within Group Policy objects click "Delegation" and then advanced. Add the group and give it the permissions Read & Apply Group Policy as shown


Now link your policy to a suitable OU.

9) Next you have to install the UE-V agent and drop users in to the Corp.Sys.UevUsers group. There are many ways to install the agent (Group policy, Manual, Config Manager) so I will leave that up to you. 

10) Once you have installed the agent and have a suitable user account to test with log onto a machine make a few changes in wordpad, lock your pc or log off and check the SettingsStoreShare, you should see that it now has a (hidden) folder created within. If not use Gpresult.exe to track down the cause, most likely the policy is not applying.

11) Now logon to a second machine and verify the wordpad settings have "roamed"

That's all for the basic setup, below I will run through a few tips:
  • If you are installing the UE-V Agent in a VDI environemtn then you will need to enable the "Do Not Use Offline Files" policy setting and install the agent with the "SyncMethod=None" parameter.
  • New templates are applied every 24 hours by default but can be forced with the ApplySettingsTemplate.exe from the agent installation path
  • You can rollback settings for individual applications (back to their original state) using Powershell see below for rolling back wordpads settings for example
Import-Module UEV
Restore-UevUserSetting -Application Wordpad

Cheers
Wayne

Tuesday 13 November 2012

MAP Error SP_Smoothen_Timeseries


When trying to refresh the inventory assessment within MAP 7.0 I was getting the message "Failed" so I checked through the log located in

C:\Program Files\Microsoft Assessment and Planning Toolkit\bin\log

I found that a stored procedure was being retried a total of 3 times and ultimately causing the refresh to fail. The error I saw in the log was this:

onSqlExceptionMessage = Caught SqlException running the stored procedure sp_smoothen_timeseries


I googled "sp_smoothen_timeseries" and found absolutely nothing, the fix actually has nothing at all to do with this stored procedure, the fix is very simple. In the log I saw that the 3 times that this SP was being executed it was running for exactly 30 minutes, like a timeout value was set somewhere.....hmmmm

A bit of googling later and I found that in the "bin" folder (see above) there is a AppConfigInfo.xml file that contains a line name "SqlCommandTimeout" with a default value of 1800 seconds (30 minutes!). So I changed this value to something a lot larger and the refresh completed successfully

Wayne

Sunday 4 November 2012

SCCM cross forest imaging

Whilst implementing SCCM for a customer who had 3 forests I was faced with the challenge of creating a single image that could be deployed to all 3 forests and still remain compliant from a licensing point of view.

So I came up with the following script:

Dim CorrectInput
Dim DomainName
Set Env = CreateObject("Microsoft.SMS.TSEnvironment")

Do While CorrectInput = False
Env("DomainName") = Inputbox("Enter the domain you wish to join the computer to Domain1, Domain2 & Domain3 are all valid inputs", "Prompt", , , 10)
If LCase(Env("DomainName")) = "domain1" Then
CorrectInput = True
ElseIf LCase(Env("DomainName")) = "domain2" Then
CorrectInput = True
ElseIf LCase(Env("DomainName")) = "domain3" Then
CorrectInput = True
End if
Loop

As you can see it prompts for input, converts to lower case, validates it and ultimately it stores the input in a task sequence variable called "DomainName" all I then have to do is duplicate the appropriate step in my task sequence and place an IF condition on it to run only when the Variable matches one of the 3 domains names, simple :)

Cheers
Wayne

Friday 5 October 2012

Flashing your NSA310 with Debian Squeeze to run Sabnzbd, Sickbeard & CouchPotato - Part 4


This one has been in my drafts forever, I thought I would take the time to post it in-case anyone followed parts 1-3.
If you missed parts 1-3 of this post here they are:

Part 1

Part 2
Part 3

Otherwise lets get started!


OK, at the end of part 3 I asked you to make a note of the MAC address assigned to eth1, providing you have it then SSH to your NSA310 and login, then type


pico /etc/rc.local


then edit your file to look exactly like mine below:


Once you have edited the file, press Ctrl+O to write it out, Ctrl+X to exit.

This statement will fix the brightness of your LEDS. Now to set your MAC address to what it should be (instead of 00:00:00:00:00:00)

type pico /etc/network/interfaces and edit your file to look like mine (changing the MAC to your own)


save and exit

now to edit sysctl.conf, type:


pico /etc/sysctl.conf and add these lines:


# Set VM min memory
vm.min_free_kbytes=8192

save and exit

Now for one last edit:

pico /default/rcs, delete the entire contents and type/paste
:
#
# /etc/default/rcS
#
# Default settings for the scripts in /etc/rcS.d/
#
# For information about these variables see the rcS(5) manual page.
#
# This file belongs to the "initscripts" package.

# delete files in /tmp during boot older than x days.
# '0' means always, -1 or 'infinite' disables the feature
TMPTIME=0

# spawn sulogin during boot, continue normal boot if not used in 30 seconds
SULOGIN=no

# do not allow users to log in until the boot has completed
DELAYLOGIN=no

# assume that the BIOS clock is set to UTC time (recommended)
UTC=yes

# be more verbose during the boot process
VERBOSE=no

# automatically repair filesystems with inconsistencies during boot
FSCKFIX=no

# mount /run/lock as a tmpfs (separately from /run)
RAMLOCK=no

# mount /run/shm as a tmpfs (separately from /run)
RAMSHM=no

# mount /tmp as a tmpfs
RAMTMP=no

again save and exit

That’s the hardware setup and ready for action now we can install Sab, CP & Sickbeard.

**NOTE** If I get time I will post these steps up, but for now Parts 1-4 are a good place for anyone to start with this

MAP - Application To Machine Correlation Report


This quick blogpost covers using Microsoft Excel to present data from a Microsoft Assessment And Planning Toolkit (MAP) database in a way that allows you to show which computers have what software installed.

If you do not have MAP installed/ inventory gathered you can follow my previous post here if you wish.

This is a really quick and simple thing to do if you have Office installed on the same host as MAP, and as I have MAP on my local machine and just import the databases I collect this is great for me :)

Firstly open an elevated instance of Excel then click Data->From Other Sources->From Data Connection Wizard

Select Microsoft SQL Server in the box that appears then press Next

In the server name box enter LOCALHOST\SQLEXPRESS

Once the list of views are displayed scroll down and select InstalledProducts_View, press Next and then Finish

The next box that appears allows you to add a pivot table if you wish, once done press OK

Voila! your data to manipulate as you wish

Cheers

EDIT: For MAP 8 you will need to connect to (localdb)\Maptoolkit

Thursday 4 October 2012

Provisioning Windows 8 to go with Config Mgr 2012

This blog post will cover provisioning Windows 8 to go USB Flash devices with Configuration Manager 2012.

Pre-Requisites


  • A working Configuration Manager 2012 SP1 installation with at least OSD
  • A Working windows 8 deployment task sequence (not covered here)
  • A Working Windows 8 Machine

**NOTE** for the purposes of my lab environment I have not included Bitlocker, therefore my windows 8 deployment task sequence does not include steps for Bitlocker and subsequently neither will the provisioned Windows To Go media.


Step 1 - Create pre staged Media

Open your Configuration Manager console and navigate to Software Library->Operating Systems. Right click on Task Sequences and click Create Task Sequence Media. The create task sequence media wizard will appear.

On the Select Media Type page make your selections as shown
Press Next

On the Media Management page select Dynamic media. 

This will allow a management point to redirect the media to another management point, based on the client location in the site boundaries. Alternatively  Site-based media ensures that the media will only contact the specified management point.

On the  Media Properties page fill out your information and select a location to save the .wim file

click Next.

On the Security page, fill out the information as shown. The user device affinity is optional but I prefer to have it set automatically, change it as you wish


Click Next

On the Task Sequence page, select your Windows 8 task sequence 

Click Next.

On the Boot Image page add your boot image and select your distribution points.
I always choose the x86 boot image as this will run on both x86  & x64 computers but you may change this as you wish

On the Images page, specify the image package that contains your windows 8 Operating system image, select the correct image index you wish to use and fill out your distribution point information

click Next.

On the Select Application page you may add additional applications to include in the media, I have not added any extra. Once done click Next

Again on the  Select Package page you may add additional packages to include in the media, I have not added any extra. Once done click Next

On the Select Driver Package page add any driver packages for the hardware this might be running on, once done click Next.

On the Distribution Points page any distribution points that contain the content required by this task sequence,once complete press Next.

On the customisation page click the star symbol to add a new variable and enter the name SMSTSPreferredAdvertID as shown

For the value you will need to locate the Package ID of your windows 8 task sequence as shown below
Click Next once done
Allow the wizard time to complete
Press Close once done, the wim file you generated will now reside in the location you specified.

Step 2 - Create The Windows 8 To Go Creator Package

In a suitable location, create a folder for this package and copy the wim file we created in step 1 to this folder.
Navigate to ProgramFiles\Microsoft Configuration Manager\OSD\Tools\WTG\Creator and copy wtgcreator.exe to the folder also.

Now we need to create a package, to do this open your Configuration Manager console and navigate to Software Library->Application Management, right click Packages and click create package

On the Package page, enter the name Windows 8 To Go Creator and tick This package contains source files. Fill out the path of the folder that contains your wim file and the wtgcreator.exe file and click Next

On the Program Type page, select Standard program, and then click Next.

On the Standard Program pagefill out the information as shown. The command line is WTGCreator.exe /wim:Win8ToGo.wim /enableBootRedirect


On the Requirements page fill out the details as shown, specifying that this program can only run on Windows 8 (32 & 64 bit)


Click Next twice and then close

Step 3 - Deploy The Windows To Go Creator Program 

Now we have to deploy the program to a collection, so first of all create a new collection with a name of Windows 8 To Go and add a windows 8 client to it

Now open the Configuration Manager console and navigate to Software Library->Application Management->Packages 

Find the Windows 8 To Go Package we just created, highlight it and click Deploy

On the General page browse and select your Windows 8 To Go Collection, 

Press Next

On the Content page add your distribution point/s to which you want to deploy the content for this package to. Press next once done

On the Deployment Settings page select Available for the deployment type and then click Next.

On the Scheduling page just press next

On the User Experience page press next also

On the Distribution Points page fill out the information as shown


Press Next once done, and then Next 2 more times and then Finish

Step 4 - Deploy The Task Sequence

Now within the Configuration Manager console navigate to Software Library->Operating System->Task Sequences

Right click on your windows 8 task sequence and click Deploy

On the General page browse and select your Windows 8 To Go Collection then press Next

On the Deployment Settings page ensure you select Only Media and PXE (hidden) as shown below

Press Next

On the Scheduling page just press next

On the User Experience page press next also

On the Alerts page press next also

On the Distribution Points page fill out the information as shown:

Press Next
Press Next 2 more times and then close

Step 5 - Running Windows To Go Creator

On your windows 8 client machine open Software Center, you should see something like this:

With your USB drive inserted into the machine click Install, wait for the content to download and you should see the following prompt


Select your drive and allow your device to be prestaged, the computer will then reboot and the task sequence should take over from there.

**NOTE** I was not actually able to test this part as I do not have a certified USB Flash drive, As soon as I get my hands on one I will verify this and update this post. However this was all based on Microsoft Documentation and should work fine.

Cheers
Wayne


Thursday 27 September 2012

Installing and running Map 7.0 on Server 2008 R2

This blog post covers the following:

  • Installing Microsoft Assessment and Planning Toolkit 7.0 (MAP)
  • Performing an  Inventory of selected computers
  • Collecting Performance Data from discovered computers
  • Generating Reports and Proposals


There are a few Software Pre-requisites you will need, don't worry if you don't have them all as the installer provides download links during installation, the pre-reqs are:

  • Microsoft .NET Framework 3.5 Service Pack 1
  • Microsoft .NET 4.0 Full Profile
  • Update 4.0.2 for Microsoft .NET Framework 4

Installing Microsoft Assessment and Planning Toolkit 7.0 (MAP)

First of all download MAP 7.0 from here (you only need to download the file called Microsoft_Assessment_and_Planning_Toolkit_Setup.exe for the purpose of installation)

Start the installer, tick the check-box and click next

Accept the terms of the license agreement, click next

Choose the installation folder, click next

Make your choice around CEIP, click next

Click install

This will install MAP 7.0 and a SQL Server Express Local Database

Once complete hit finish and MAP will launch.

Performing an Inventory of selected computers

You will be presented with the option of creating a new database or using an existing one upon launching MAP for the first time. Select create an inventory database, fill out the details and press ok


Press the GO button shown below to launch the inventory and assessment wizard

In my example I am going to choose only Windows Computers, but you can choose whatever you need to gather information from.

Press next

This screen has some very important options and considerations:


I will go through each method and let you decide which ones you wish to use:

Active Directory Domain Services (AD DS) - Excellent if your Active Directory is squeaky clean, otherwise you will end up with a lot of failures

Windows Networking protocols - This will utilize NetBIOS to discover computers on the network. It is usually a very successful method, however devices that are powered off will not be found

System Centre Configuration Manager - This will use your Config Manager database as the source, another excellent method

Scan IP Range - Again another solid method which can be used to scan domain and non-domain computers. However devices that are powered off will not be found

Manually enter computer names and credentials - very time consuming and laborious

Import computer names from a file - An excellent method if you happen to have a CSV of your devices handy

In my example I will choose AD DS and windows networking protocols and press next

Below fill in your domain and an account that has enough privileges to list the objects in Active directory

Press next

Below you can drill down through your AD structure and select individual OUs, in my example I have chosen the OU my servers reside in.

Press next

Now onto the windows networking protocols. Fill in your domain name

Press next

Now we need to supply credentials that can be used to interrogate the machines we find. In my example I am using a single account - the domain admin. However best practice here is to use and account that has local admin rights across the machines and NOT the domain admin. You can specify multiple accounts here if you wish. Click create to enter your credentials and hit close and next when done


On this screen you can simply set the order you wish the credentials to be tried in, order as you wish and press next, then hit finish.

The discovery will begin, once complete we proceed to step 2

Collecting Performance Data from discovered computers

This time press GO on step 2


Again I am only interested in windows machines and will set my duration to one week from today's date

Once done hit next

On the next screen I am just going to press next, but if you have a text file listing your computers you can also import it.

Hit next

As you can see the computers discovered in the first step are listed

Select all and press next

On the next screen you have the option to add more credentials to use if you wish, MAP remembers and will use the credentials we specified in step 1. Here I am going to hit next to skip past this and then finish.

Now the performance metrics will be gathered
PIC15
You can safely click close and this will still run in the background

**Note** This is using the built in windows counters to gather information and shouldn't impact servers, however if it does you can cancel the process as shown below:


Once the time you specified has elapsed you will see step 2 change to complete:


Now we need to refresh the inventory assessment and collect our reports, to do this:

Click Tools -> Refresh Inventory Assessment

Now click File -> Prepare New Reports and Proposals

Select all:

Hit next and then finish

Once complete click View-> Saved Reports and Proposals to be taken to the location on disk of those reports comprised of all the info we have gathered.

Troubleshooting

I thought I would throw this in for good measure, If you are unable to discover computers, then the 2 main causes in my experience are:

1) A firewall is blocking NetBIOS & WMI
2) The credentials you have specified are invalid

Another possibility is that WMI is corrupt on the computer, in which case you will have to rebuild the WMI repository (which I'm not going to cover here)

That's all for now,
Cheers!