Following on from Steve Beaumont's post around Windows Intune, it is possible to use the .onmicrosoft address you chose to sync users into the cloud.
My testlab is called testlab.local and my chosen Intune domain name is testlab2013.onmicrosoft.com
To get my users syncing I had to create a UPN suffix in AD of "testlab2013.onmicrosoft.com", alter the users logon name to the new suffix, delete the users from SCCM and force a user discovery and hey presto the users began to sync upto Windows Intune no problems.
This is obviously great for a lab as you don't need to own a domain and don't need to verify any domains to do any testing
Cheers
Wayne
Sunday, 13 January 2013

Thursday, 10 January 2013
Software Asset Management (SAM) With SCCM 2012
In this post I want to explore managing licensing within using only SCCM 2012 SP1.
Neil Peterson created a fantastic 3 part blog post that shows how to remove unused software from machines using Orchestrator here: http://bit.ly/1162RqF
In this however he does not cover the very basics of importing 3rd party licenses into configuration manager so that is what I will cover here.
Firstly you must manually create a CSV file that holds the licensing information you wish to import.
In an ideal world the procurement department would create this file, upload it to an internal webpage along with a few basic details and orchestrator would take it from there, but here I am focusing on SCCM and SCCM alone, lets assume we have neither the luxury of time nor orchestrator :)
The CSV File
The csv file must be structured in a certain manner, below is a basic example:

However there are a few caveats with this, these are:
SELECT * FROM V_GS_INSTALLED_SOFTWARE WHERE ProductName0 LIKE %Zip%
This returned all of the database rows containing ZIP (1 in total) shown below

Now the information the query returned I was able to build my license file.
Once the file was ready I saved it as a .CSV file and opened with notepad to check the formatting, then went ahead and imported into SCCM.
Importing A Custom CSV file into SCCM
Open the console and navigate to Assets And Compliance -> Asset Intelligence. Right click on Asset Intelligence and select Import Software Licenses, run through the wizard ensuring you select General License statement when given the choice. Once complete navigate to Monitoring -> Reporting and run the report named License 15A - General License Reconciliation Report
This will show you a basic license count and usage and most importantly the difference between the two.

That's all for this post, obviously this can be expanded upon greatly, this is merely the foundations for anyone just starting out with SAM via SCCM.
Cheers
Wayne
Neil Peterson created a fantastic 3 part blog post that shows how to remove unused software from machines using Orchestrator here: http://bit.ly/1162RqF
In this however he does not cover the very basics of importing 3rd party licenses into configuration manager so that is what I will cover here.
Firstly you must manually create a CSV file that holds the licensing information you wish to import.
In an ideal world the procurement department would create this file, upload it to an internal webpage along with a few basic details and orchestrator would take it from there, but here I am focusing on SCCM and SCCM alone, lets assume we have neither the luxury of time nor orchestrator :)
The CSV File
The csv file must be structured in a certain manner, below is a basic example:

However there are a few caveats with this, these are:
- Name, Publisher, Version and EffectiveQuantity columns must contain information the rest are optional
- Any dates entered must be in the format mm/dd/yyyy
- Name and Version must also match what is in the site database for that piece of software.
SELECT * FROM V_GS_INSTALLED_SOFTWARE WHERE ProductName0 LIKE %Zip%
This returned all of the database rows containing ZIP (1 in total) shown below

Now the information the query returned I was able to build my license file.
Once the file was ready I saved it as a .CSV file and opened with notepad to check the formatting, then went ahead and imported into SCCM.
Importing A Custom CSV file into SCCM
Open the console and navigate to Assets And Compliance -> Asset Intelligence. Right click on Asset Intelligence and select Import Software Licenses, run through the wizard ensuring you select General License statement when given the choice. Once complete navigate to Monitoring -> Reporting and run the report named License 15A - General License Reconciliation Report
This will show you a basic license count and usage and most importantly the difference between the two.

That's all for this post, obviously this can be expanded upon greatly, this is merely the foundations for anyone just starting out with SAM via SCCM.
Cheers
Wayne
Friday, 28 December 2012
Creating A Virtual SAN Using Windows Server 2012 ISCSI Target Role Under Hyper-V
This Blogpost covers the following:

Allow the installation to complete and the server to reboot.
Next if you wish for your virtual SAN to have SMI-S support then you need to first install KB2758246
Once that has been installed on the System Center Virtual Machine Manager SP1 media you will find iSCSITargetSMISProvider.msi in the AMD64\Setup\MSI folder
Run through the install which is no more complex than clicking Next, Next and Finish.

Now we have an iSCSI target server setup that supports SMI-S, more on SMI-S can be found here
In my lab I have simply attached a VHDX to my Server and then within that created my virtual iSCSI disks, this is by no means ideal however. I would have liked to have attached a physical disk to my virtual machine and run the Virtual iSCSI disks straight from that but didn't have a spare SSD lying around.
So to summarize my file server has a C: drive and an E: drive, both are VHDX files that live on the Hyper-V host everything runs on.
Now for the fun part, open Server Manager and browse to File And Storage Services -> iSCSI under iSCSI Virtual Disks click Tasks-> New iSCSI Virtual Disk

This will launch the new iSCSI Virtual Disk Wizard, select the volume on which you wish to store the disk and press Next

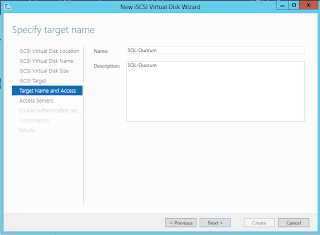
Give the disk a meaningful name, in my case I was setting up a SQL cluster so this was going to be my Quorum disk

Once complete press Next
Enter a size for your disk and press Next once complete

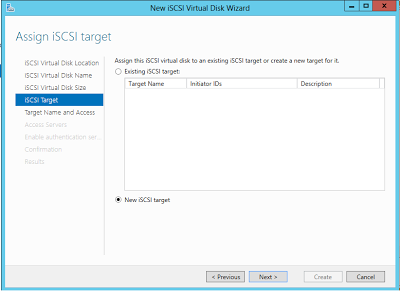
On the iSCSI Target page select New iSCSI Target and press Next
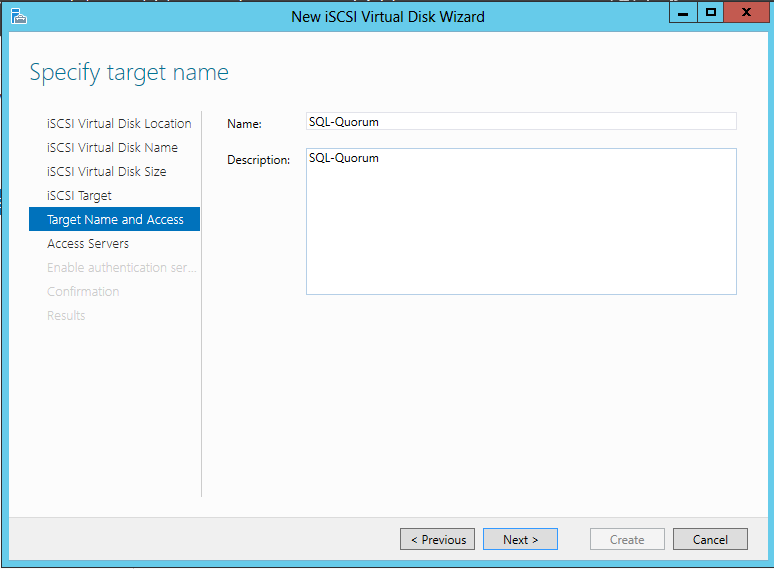
Give the Target a meaningful name and press Next once complete
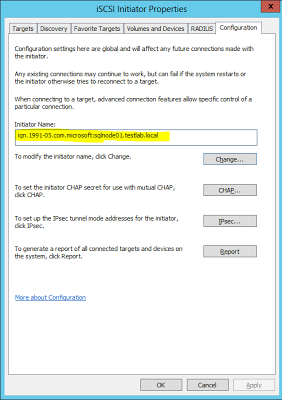
Now we need the IQN of the initiator, to get this logon to the server you are connecting from and launch the iSCSI initiator control panel applet, if it prompts you to start the service click yes.
On the Configuration tab make a note of the Initiator Name
Back on the Target Server on the on the Access Servers page click Add
Now enter the IQN of the initiator in the box as shown
..

Press ok and you will see the iSCSI initiator listed, once complete click Next
Since this is a lab I chose not to configure Authentication and just pressed Next and then Create.
Now switch over to the iSCSI initiator machine (in my case one of the SQL Nodes) and in the iSCSI initiator software click on the Discovery tab
Click Discover Portal and enter the DNS Name of the iSCSI Target server and press OK

Now click on the Targets tab and you should see the target listed, select it and click Connect

If the connection was successful you will see the status change to Connected as shown


That's all there is to it, now open disk manager and bring the disk online :)
Cheers
Wayne
- Installing the iSCSI Target Server Role on Server 2012
- Installing the iSCSI Target SMI-S Provider (Optional)
- Creating an iSCSI Virtual Disk
- Connecting to the iSCSI Virtual Disk from another machine using iSCSI Initiator
NOTE:**This is for my lab only, I do not recommend you do this in production***
First launch the add roles and features wizard in server 2012 and on the roles page select the iSCSI Target Server Role as shown below

Next if you wish for your virtual SAN to have SMI-S support then you need to first install KB2758246
Once that has been installed on the System Center Virtual Machine Manager SP1 media you will find iSCSITargetSMISProvider.msi in the AMD64\Setup\MSI folder
Run through the install which is no more complex than clicking Next, Next and Finish.

Now we have an iSCSI target server setup that supports SMI-S, more on SMI-S can be found here
In my lab I have simply attached a VHDX to my Server and then within that created my virtual iSCSI disks, this is by no means ideal however. I would have liked to have attached a physical disk to my virtual machine and run the Virtual iSCSI disks straight from that but didn't have a spare SSD lying around.
So to summarize my file server has a C: drive and an E: drive, both are VHDX files that live on the Hyper-V host everything runs on.
Now for the fun part, open Server Manager and browse to File And Storage Services -> iSCSI under iSCSI Virtual Disks click Tasks-> New iSCSI Virtual Disk

This will launch the new iSCSI Virtual Disk Wizard, select the volume on which you wish to store the disk and press Next

Give the disk a meaningful name, in my case I was setting up a SQL cluster so this was going to be my Quorum disk

Once complete press Next
Enter a size for your disk and press Next once complete

On the iSCSI Target page select New iSCSI Target and press Next
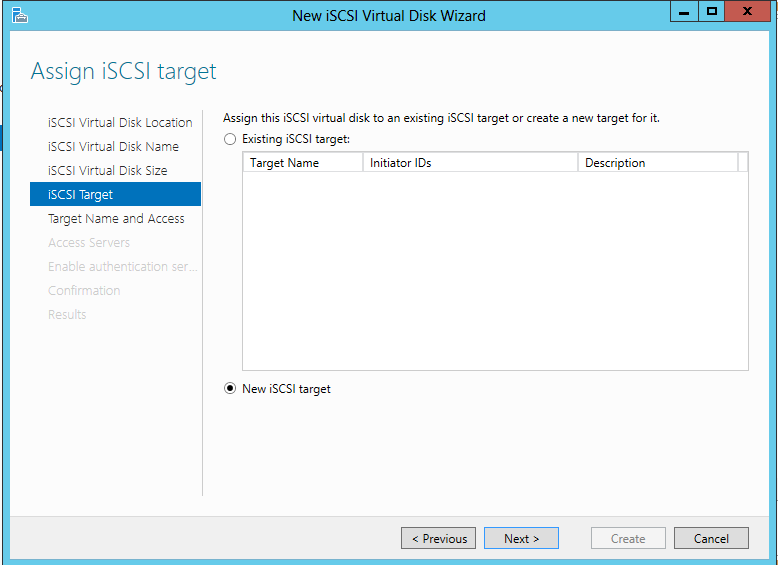
Give the Target a meaningful name and press Next once complete
Now we need the IQN of the initiator, to get this logon to the server you are connecting from and launch the iSCSI initiator control panel applet, if it prompts you to start the service click yes.
On the Configuration tab make a note of the Initiator Name

Back on the Target Server on the on the Access Servers page click Add
Now enter the IQN of the initiator in the box as shown
..

Press ok and you will see the iSCSI initiator listed, once complete click Next
Since this is a lab I chose not to configure Authentication and just pressed Next and then Create.
Now switch over to the iSCSI initiator machine (in my case one of the SQL Nodes) and in the iSCSI initiator software click on the Discovery tab
Click Discover Portal and enter the DNS Name of the iSCSI Target server and press OK

Now click on the Targets tab and you should see the target listed, select it and click Connect
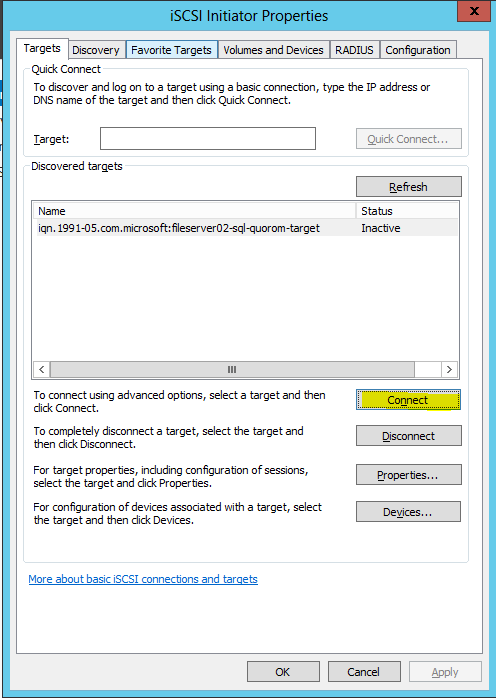
If the connection was successful you will see the status change to Connected as shown


That's all there is to it, now open disk manager and bring the disk online :)
Cheers
Wayne
Thursday, 22 November 2012
Enabling .Net 3.5 in your windows 8 Image
This blogpost covers how to enable .Net 3.5 in your windows 8 wim file and saves you the trouble of running DISM after deployment (or during) to enable it.
Note - This blogpost assumes that you are running this on a windows 8 / server 2012 machine.
First copy the contents of your Windows 8 ISO to a Directory on a drive (Lets call that "C:\Windows 8 Source" here)
Create a folder on your C: drive called "MountedWim"
Now open up an administrative command prompt and type the following:
Dism /Mount-Wim /Wimfile:"C:\Windows 8 Source\Sources\Install.wim" /index:1 /MountDir:C:\MountedWim
This will mount the windows 8 wim file into this directory
Now type the following:
Dism /Image:C:\MountedWim /EnableFeature /FeatureName:NetFX3 /All /Source:"C:\Windows 8 Source\Sources\sxs"
This will enable .Net 3.5 in the image however we now need to save the changes we have made, next type:
Dism /UnMount-Wim /MountDir:C:\MountedWim /Commit
This will unmount the wim file and commit the changes.
Now deploy the image and you should have .Net 3.5 enabled by default :)
A quick "gotcha" on this, if you use offline servicing in configuration manager to integrate any .Net 3.5 updates into this wim since the .Net 3.5 install is in a "Pending" state your Task Sequence will fail, so watch out for that.
Cheers
Wayne
Note - This blogpost assumes that you are running this on a windows 8 / server 2012 machine.
First copy the contents of your Windows 8 ISO to a Directory on a drive (Lets call that "C:\Windows 8 Source" here)
Create a folder on your C: drive called "MountedWim"
Now open up an administrative command prompt and type the following:
Dism /Mount-Wim /Wimfile:"C:\Windows 8 Source\Sources\Install.wim" /index:1 /MountDir:C:\MountedWim
This will mount the windows 8 wim file into this directory
Now type the following:
Dism /Image:C:\MountedWim /EnableFeature /FeatureName:NetFX3 /All /Source:"C:\Windows 8 Source\Sources\sxs"
This will enable .Net 3.5 in the image however we now need to save the changes we have made, next type:
Dism /UnMount-Wim /MountDir:C:\MountedWim /Commit
This will unmount the wim file and commit the changes.
Now deploy the image and you should have .Net 3.5 enabled by default :)
A quick "gotcha" on this, if you use offline servicing in configuration manager to integrate any .Net 3.5 updates into this wim since the .Net 3.5 install is in a "Pending" state your Task Sequence will fail, so watch out for that.
Cheers
Wayne
Thursday, 15 November 2012
Microsoft UE-V Setup & Configuration
This blogpost aims to cover step by step the setup and configuration of UE-V to a basic level.Lets get started...


First of all you have to have Software Assurance as UE-V comes as part of MDOP (Microsoft Desktop Optimisation Pack) if you don't have SA then UE-V is just one of the many reasons you need it.
Secondly I will run through the components of UE-V to bring you up to speed:
UE-V is comprised of 4 components
- Settings Store - Where the agent stores the application settings
- UE-V Agent - the Agent itself
- Settings location Template- Files that define what will be synced on a per app basis (One template per app)
- UE-V Generator - used to capture application settings to create an XML based template the UE-V Agent can read
On with the guide....
1) In a suitable location (preferably a DFS Namespace) create 2 folders called "SettingsStoreShare" & "SettingsTemplateCatalog" we will discuss permissions on these folders in a moment
2) Create an Active Directory Group that will contain users we wish to have UE-V for the purpose of this post that group will be called "Corp.Sys.UevUsers" but you may call it whatever fits your naming standards
3) Now share permissions on the 2 folders:
SettingsStoreShare
Share Name - SettingsStoreShare$
Share Permissions - Corp.Sys.UevUsers (Full Control)
NTFS Permissions - Corp.Sys.UevUsers (List Folder/Read Data & Create Folders / append data)
SettingsTemplateCatalog
Share Name - SettingsTemplateCatalog$
Share Permissions - Domain Computers (Full Control)
NTFS Permissions - Domain Computers (Read Access) & Domain Admins (Full Control)
4) Take your UE-V admx file and place it in your central store,which should be located at \\FQDN\Sysvol\FQDN\Policies\PolicyDefinitions and place the adml file in the same location but one folder deeper \\FQDN\Sysvol\FQDN\Policies\PolicyDefinitions\en-us
5) Before we create our group policy object, know that it contains both user and computer settings and in my case is linked to an OU that is above both my Windows workstations and my Users so will apply the settings to both. If your Active Directory is not structured as such I recommend creating 2 policies here.
Open the Group policy management console and create a group policy Object, then browse to Computer Configuration\Policies\Administrative Templates\Windows Components\Microsoft User Experience Virtualization
Now change the policy as shown in the picture

Still in the policy browse to User Configuration\Policies\Administrative Templates\Windows Components\Microsoft User Experience Virtualization
Now change the policy as shown in the picture

You will notice the Applications node, for now just enable Notepad/Wordpad within this node for testing purposes.
UE-V relies entirely on Microsoft's Offline Files Services so we also need to set a policy up to ensure this is switched on. I have enabled this policy within my UE-V GPO but you may already have it set somewhere so I will leave it up to you to decide how best to do this. The offline files setting we need to enable is located here:
Computer Configuration\Policies\Administrative Templates\Network\Offline Files\Allow Or Disallow The Use Of The Offline Files Feature. This should be set to "Enabled"
6) Next we need to create a WMI filter to apply to this policy, this filter will ensure that only Windows 7 or Windows 8 devices can apply the policy
Within Group Policy management console, right click on the WMI filters node and select New. Give it a name like Windows 7&8 and add the following WMI query:
Select * from Win32_OperatingSystem WHERE Version like "6.1%" AND ProductType="1" OR Version like "6.2%" AND ProductType="1"
Save this filter.
Save this filter.
ProductType="1" ensures that we only apply this Policy to workstations and NOT Servers!
7) Now open he group policy objects node and select your new WMI filter as shown:

8) Now to add some filtering for the users, we only want users in our Corp.Sys.UevUsers group to apply this policy so still within Group Policy objects click "Delegation" and then advanced. Add the group and give it the permissions Read & Apply Group Policy as shown

Now link your policy to a suitable OU.
9) Next you have to install the UE-V agent and drop users in to the Corp.Sys.UevUsers group. There are many ways to install the agent (Group policy, Manual, Config Manager) so I will leave that up to you.
10) Once you have installed the agent and have a suitable user account to test with log onto a machine make a few changes in wordpad, lock your pc or log off and check the SettingsStoreShare, you should see that it now has a (hidden) folder created within. If not use Gpresult.exe to track down the cause, most likely the policy is not applying.
11) Now logon to a second machine and verify the wordpad settings have "roamed"
That's all for the basic setup, below I will run through a few tips:
- If you are installing the UE-V Agent in a VDI environemtn then you will need to enable the "Do Not Use Offline Files" policy setting and install the agent with the "SyncMethod=None" parameter.
- New templates are applied every 24 hours by default but can be forced with the ApplySettingsTemplate.exe from the agent installation path
- You can rollback settings for individual applications (back to their original state) using Powershell see below for rolling back wordpads settings for example
Import-Module UEV
Restore-UevUserSetting -Application Wordpad
Cheers
Wayne
Tuesday, 13 November 2012
MAP Error SP_Smoothen_Timeseries
When trying to refresh the inventory assessment within MAP 7.0 I was getting the message "Failed" so I checked through the log located in
C:\Program Files\Microsoft Assessment and Planning Toolkit\bin\log
I found that a stored procedure was being retried a total of 3 times and ultimately causing the refresh to fail. The error I saw in the log was this:
onSqlExceptionMessage = Caught SqlException running the stored procedure sp_smoothen_timeseries
I googled "sp_smoothen_timeseries" and found absolutely nothing, the fix actually has nothing at all to do with this stored procedure, the fix is very simple. In the log I saw that the 3 times that this SP was being executed it was running for exactly 30 minutes, like a timeout value was set somewhere.....hmmmm
A bit of googling later and I found that in the "bin" folder (see above) there is a AppConfigInfo.xml file that contains a line name "SqlCommandTimeout" with a default value of 1800 seconds (30 minutes!). So I changed this value to something a lot larger and the refresh completed successfully
Wayne
Sunday, 4 November 2012
SCCM cross forest imaging
Whilst implementing SCCM for a customer who had 3 forests I was faced with the challenge of creating a single image that could be deployed to all 3 forests and still remain compliant from a licensing point of view.
So I came up with the following script:
Dim CorrectInput
Dim DomainName
Set Env = CreateObject("Microsoft.SMS.TSEnvironment")
Do While CorrectInput = False
Env("DomainName") = Inputbox("Enter the domain you wish to join the computer to Domain1, Domain2 & Domain3 are all valid inputs", "Prompt", , , 10)
If LCase(Env("DomainName")) = "domain1" Then
CorrectInput = True
ElseIf LCase(Env("DomainName")) = "domain2" Then
CorrectInput = True
ElseIf LCase(Env("DomainName")) = "domain3" Then
CorrectInput = True
End if
Loop
As you can see it prompts for input, converts to lower case, validates it and ultimately it stores the input in a task sequence variable called "DomainName" all I then have to do is duplicate the appropriate step in my task sequence and place an IF condition on it to run only when the Variable matches one of the 3 domains names, simple :)
Cheers
Wayne
Subscribe to:
Posts (Atom)